For the purpose of learning, WordPress can be installed on your PC by turning your Local drive into a web host server. Installing WordPress on local host is crucial not only because it enables you to learn it but also give you a test drive of your WordPress website you can host over internet on a custom domain. Hosting is not free anywhere and wherever it is free, you're kept deprived from some features. On free hosts, you can not do as much as you can on a paid hosting server with your WordPress site. The reason of emphasizing the drawbacks of free-hosting was not to demotivate you. I just want to tell you guys that, free hosting aren't for the purpose of learning WordPress. It consumes more time and more Data usage. Hence, its better to install WordPress on your own computer and learn it without any internet connection.

As you need not to connect to internet in order to manage a WordPress on your local host, it is economical and time saving. This way of learning WordPress gives you a fast and furious web development experience.
I've seen many beginners setting up WordPress on a paid web host server without any proper knowledge thereof. But the results are really hilarious. The only thing they knew was writing posts and uploading pictures therein. As a result, their website crumbled to rubble and their blog was ruined into dust.
Now I've brought this magnificent tutorial right for you so that you can install WordPress on your personal computer and can test your skill on it. Once you're ready to bloom, host it online on a paid hosting server. I guarantee your success.
First of all, Wordpress is based on PHP and is a content management system which can only be run on a hosting server and local drive are not able to run a PHP file on a web browser until the drive is converted into a hosting server. When we convert our local hard disk into a hosting server, it is called a local host.
To create a local host on your computer, I use XAMPP which is a PHP simulator that creates a host server on my computer and enable me to install any PHP script on that.
There are many software to make a local host on your computer.
XAMPP - Download Here
WAMP - Download Here
Download any of the above software and install it on your computer. ( I recommend WAMPP)
Now you have a webserver where you can host data upto the disk capacity.
Now, You need wordpress software.
Goto Wordpress.org and download wordpress and when downloaded, extract it into your Drive.
Now copy the folder named wordpress in wordpress 4.1 and paste it into
C://XAMPP//HTDOC
Now rename the folder "wordpress" with your required web URL you want.
Here the journey Starts.
Open XAMPP control panel from program files and enable first two options. Your computer may ask your to allow permission. Click allow.
Now open your webbrowser. Mozilla or chrome.
In the address bar type.
localhost/phymyadmin and click go.
Now you will see a window like this, Click Data Base on the top left menu as directed by the arrow.
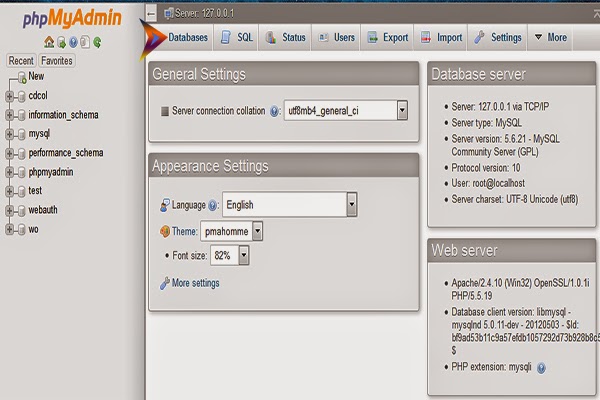
When you click database, you will see a screen of existing databases. Do not touch any of these.
Type The new database name and click create.
Now open is web browser, localhost/wordpress (your renamed name)
The First window you'll see will be asking to chose your language you want to install wordpress in.
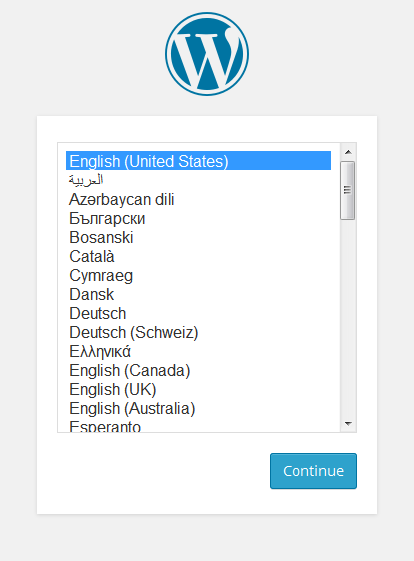
Now chose your language and click Continue.
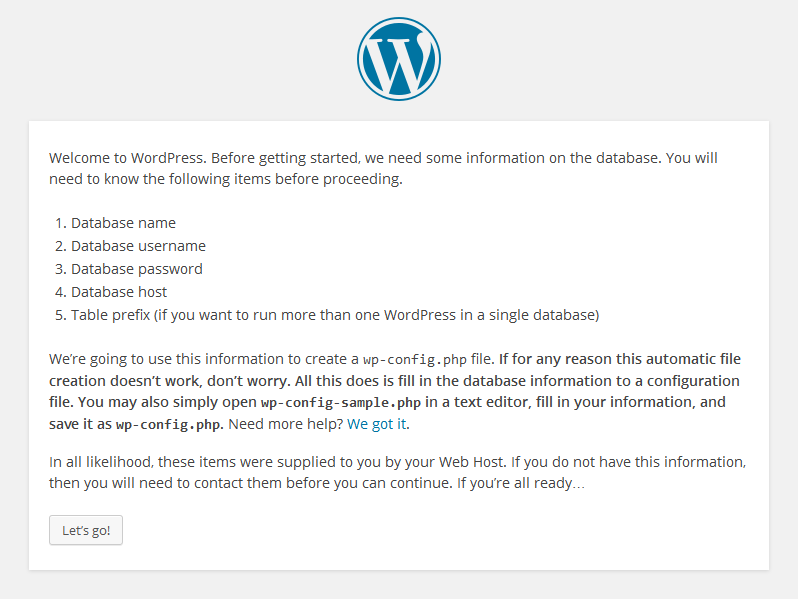
Another window will be opened and that's just for the confirmation that thing you'll need to input when you setup. Just click "Let's Go!" there.
Now you are on the place where you need to remember with which name you created database in PHPmyAdmin.
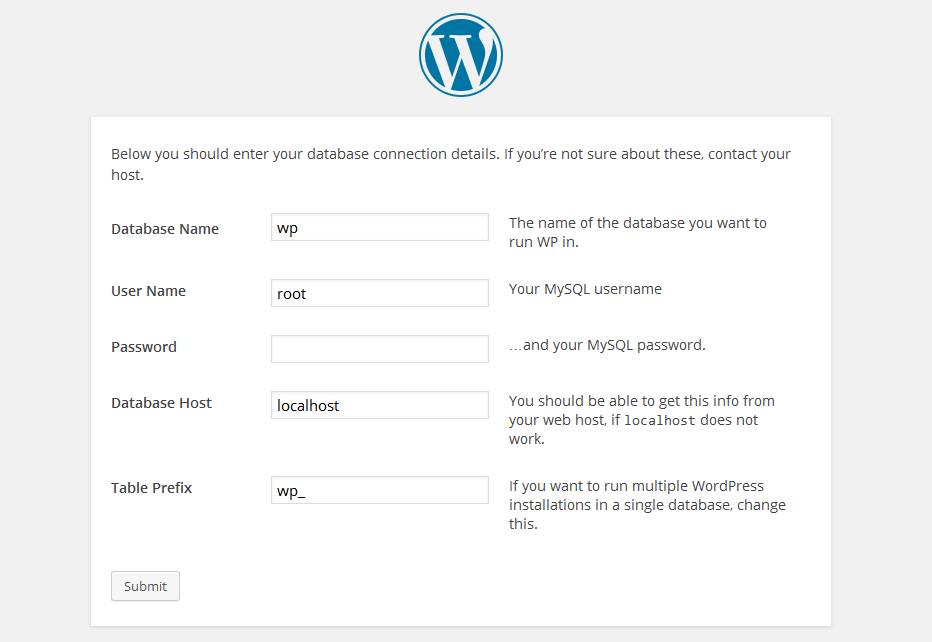
put information there. For example it input WP which was the name i created database in PHPmyadmin with.
Further, username will be : "root"
Leave the password blank and click Submit.
In case you entered wrong name of the database, it will show you an error. But i told you the right path. It will be asking you to run the install.
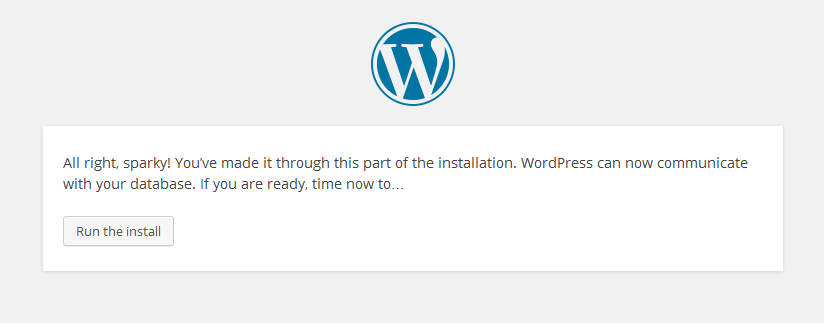
Click Run the Install.
Now this is the final step to set up wordpress on local host.
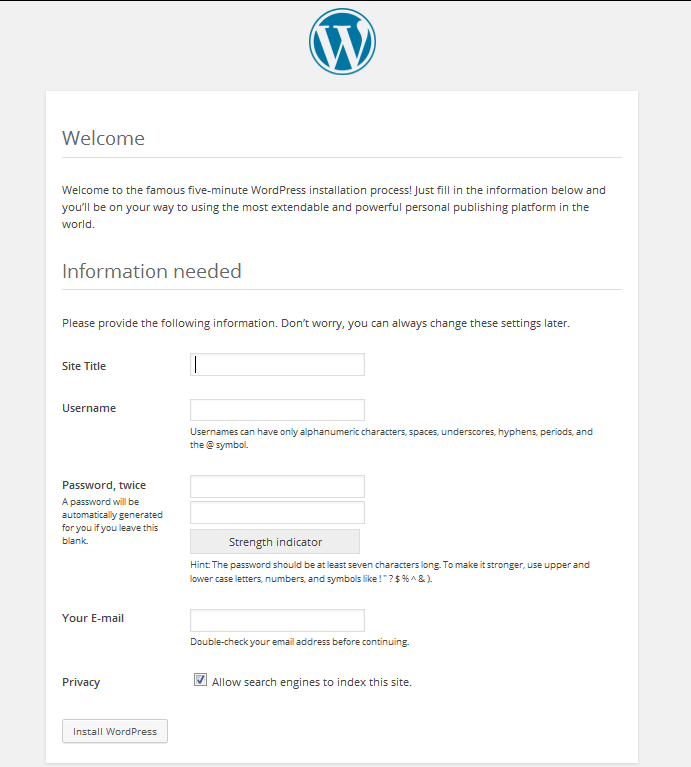
Input your required site name, username to login into Admin section and password thereof in the respective fields.
Now click Install wordpress and click login in the next screen.
The wp-login window to login into your wordpress site admin dashboard is before your.
Input the login credentials and Lets rock.
You're on your journey to wordpress.

As you need not to connect to internet in order to manage a WordPress on your local host, it is economical and time saving. This way of learning WordPress gives you a fast and furious web development experience.
I've seen many beginners setting up WordPress on a paid web host server without any proper knowledge thereof. But the results are really hilarious. The only thing they knew was writing posts and uploading pictures therein. As a result, their website crumbled to rubble and their blog was ruined into dust.
Now I've brought this magnificent tutorial right for you so that you can install WordPress on your personal computer and can test your skill on it. Once you're ready to bloom, host it online on a paid hosting server. I guarantee your success.
First of all, Wordpress is based on PHP and is a content management system which can only be run on a hosting server and local drive are not able to run a PHP file on a web browser until the drive is converted into a hosting server. When we convert our local hard disk into a hosting server, it is called a local host.
To create a local host on your computer, I use XAMPP which is a PHP simulator that creates a host server on my computer and enable me to install any PHP script on that.
There are many software to make a local host on your computer.
XAMPP - Download Here
WAMP - Download Here
Download any of the above software and install it on your computer. ( I recommend WAMPP)
Now you have a webserver where you can host data upto the disk capacity.
Now, You need wordpress software.
Goto Wordpress.org and download wordpress and when downloaded, extract it into your Drive.
Now copy the folder named wordpress in wordpress 4.1 and paste it into
C://XAMPP//HTDOC
Now rename the folder "wordpress" with your required web URL you want.
Here the journey Starts.
Open XAMPP control panel from program files and enable first two options. Your computer may ask your to allow permission. Click allow.
Now open your webbrowser. Mozilla or chrome.
In the address bar type.
localhost/phymyadmin and click go.
Now you will see a window like this, Click Data Base on the top left menu as directed by the arrow.

When you click database, you will see a screen of existing databases. Do not touch any of these.
Type The new database name and click create.
Now open is web browser, localhost/wordpress (your renamed name)
The First window you'll see will be asking to chose your language you want to install wordpress in.

Now chose your language and click Continue.

Another window will be opened and that's just for the confirmation that thing you'll need to input when you setup. Just click "Let's Go!" there.
Now you are on the place where you need to remember with which name you created database in PHPmyAdmin.

put information there. For example it input WP which was the name i created database in PHPmyadmin with.
Further, username will be : "root"
Leave the password blank and click Submit.
In case you entered wrong name of the database, it will show you an error. But i told you the right path. It will be asking you to run the install.

Click Run the Install.
Now this is the final step to set up wordpress on local host.

Input your required site name, username to login into Admin section and password thereof in the respective fields.
Now click Install wordpress and click login in the next screen.
The wp-login window to login into your wordpress site admin dashboard is before your.
Input the login credentials and Lets rock.
You're on your journey to wordpress.


EmoticonEmoticon